
Sky SB601 Wireless Booster Review – Setup and Performance Tests
Sky are now offering a Wireless Booster as a means of extending the range of your wireless network. This is a review of how it performs and what other options are available.
Unpacking the Sky SB601 Wireless Booster
The box comes with the following contents:
- The SB601 booster
- A power adaptor
- Ethernet cable
- Set up Guide
See the images below for more details on the booster, clicking on one will take you through a slide show of the unpacking sequence.


Setting Up the Booster
There are two ways to set up the booster and both of them are straightforward. Note that the router you are connecting to does not need to be a sky one, it will work with any router.
Using the WPS Button
This is the easiest approach; power up the booster and place it reasonably close to the router. Then press the WPS button on your router and then (within two minutes) press the WPS button on the booster. After a short period of time the booster will be synchronised and can be moved to the desired location.
Manual Setup
If your router doesn’t support WPS; the booster should be powered up but also connected to a PC using the supplied Ethernet cable. When connected, accessing a specific webpage on the PC (http://skywirelessbooster.local) will bring up a page showing all of the available networks. Selecting your one and entering a password when prompted will complete the setup.
Performance
One thing to bear in mind with devices like this is that while they can get you a signal where previously had a black spot, the speed of the data will never be as good. This is because the data has to be sent to the booster, then the booster has to send it on. The same situation happens on the return journey. At the very least that means that the throughput is reduced to half, and in practice it might go down further than that.
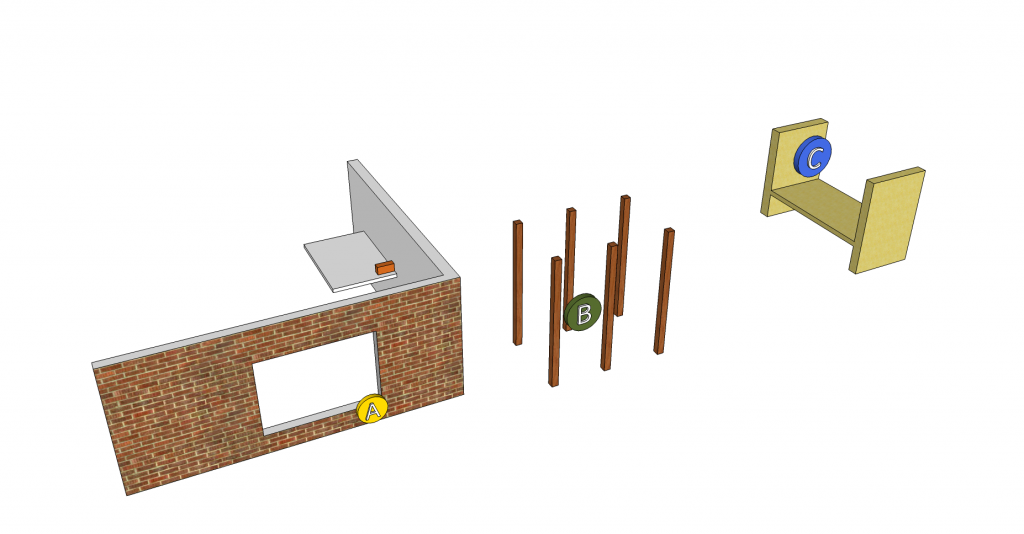
The picture below shows my setup and the results that I achieved. The router is shown as the orange box on a flat surface inside the house. Measurements are taken at point A (just outside the window), point B (a pergola about 3 metres from the window and about 4 metres from the router and point C (a garden seat about 10 metres from the window and the router. The bandwidth and signal strength measurements were taken using an iPhone 4S running iOS6.
When the signal was measured next to the router (a Sky SR101), the download speed was 16Mbytes/sec, the upload speed was 1Mbyte/sec and the signal strength, needless to say, was 3 bars. The performance in the rest of the garden was measured in various configurations and these are explained below.
No Wireless Booster
Point B – Pergola: Download speed was 1Mbyte/sec, the upload speed was 160kbyte/sec and the signal strength was 2 bars.
Point C: Garden Seat: Failed to make a connection at all.
This is the ideal situation for the wireless booster; with no signal reaching some parts of the garden at all the booster should help. The distance from the router to point C is not that far but with the signal having to pass through a cavity wall, it can be seen that the signal will be heavily attenuated.
Wireless Booster at Pergola (point B)
Point B – Pergola: Download speed was 1Mbyte/sec, the upload speed was 160kbyte/sec and the signal strength was 3 bars.
Point C: Garden Seat: Download speed was 1Mbyte/sec, the upload speed was 160kbyte/sec and the signal strength was 3 bars.
The interesting thing to note here is that the speeds at point B have not improved at all, but we now are able to get a strong signal at both this point and the garden seat which previously was a black spot. This also shows however that the boosters performance is still dependant on the quality of the signal it receives.
Wireless Booster at Back Window (point A)
Point B – Pergola: Download speed was 4Mbytes/sec, the upload speed was 900kbytes/sec and the signal strength was 3 bars.
Point C: Garden Seat: Download speed was 4Mbytes/sec, the upload speed was 900kbytes/sec and the signal strength was 3 bars.
Significant improvement encountered here. The booster, by having line of sight with the router, is getting good signal strength and then is able to retransmit that at a reasonably high rate, but still less than the speed at the router.
Summary
If you have an area of your home where you can’t get a Wi-Fi signal, this will sort that problem for you. What it will not do is get you the same Wi-Fi speed at these more remote spots; this is a problem with wireless boosters in general, not one that is restricted to this device.
If you want to get high speed Wi-Fi around your house, you will need to install access points (APs) and these will need to be connected to your router using a wired connection. In a future post I will be reviewing how the TP-Link TL-WR702N performs.
Other Sky Product Reviews
Feature image is courtesy of Thomas Leuthard under a creative commons licence, original can be seen here.