Trimming Posters to Fit Standard Frames – Photoshop Tool
As I have found out the hard way, not all picture frame sizes match with the common poster sizes. This Photoshop file allows a choice of border sizes to be set up and sets up a trim border so that one size can easily be trimmed to fit.
Standard Frame & Poster Sizes
In Europe, picture frame sizes typically come in A4, A3, A2, 50x70mm, A1 and 70x100mm.
Typically, (rectangular) posters are offered in the following sizes, 14”x11”, A3, 16”x12”, 18”x12”, 20”x16”, 21”x16”, A2, 24”x16”, 26.7”x 20”, 30”x20”, 40”x30”, 45”x30”.
If ordering posters, the following table shows the frame to purchase. Rows shown in green are recommended, the rest are not. In the case of a non recommended poster size, only choose that if you intend mounting it directly on to a wall, i.e. without a frame.
| Poster Size | Frame to Use | Trimming Needed |
| 14”x11” (35.6cm x 27.9cm) | A4 (29.7cm x 21cm) | Yes, with a lot of wastage |
| A3 | A3 | No |
| 16”x12” (40.6cm x 30.5cm) | A4 (29.7cm x 21cm) | Yes, with a lot of wastage |
| 18”x12” (45.7cm x 30.5cm) | A3 (42cm x 29.7cm) | Yes, minimal wastage |
| 20”x16” (50.8cm x 40.6cm) | A3 (42cm x 29.7cm) | Yes, with a lot of wastage |
| 21”x16” (53.3cm x 40.6cm) | A3 (42cm x 29.7cm) | Yes, with a lot of wastage |
| A2 | A2 | No |
| 24”x16” (61cm x 40.6cm) | None recommended | N/A |
| 26.7”x 20” (67.8cm x 50.8cm) | A2 (59.4cm x 42cm) | Yes, with a lot of wastage |
| 30”x20” (76.2cm x 50.8cm) | 50x70cm | Yes, minimal wastage |
| 40”x30” (101.6cm x 76.2cm) | 70x100cm | Yes, minimal wastage |
| 45”x30” (114.3cm x 76.2cm) | 70x100cm | Yes, with a lot of wastage |
Clicking the link below will allow you to download a zip file which contains six Photoshop files that allows the margins and trim area to be set automatically. Note these also work for Photoshop Elements. The Photoshop files are based on the three recommended sizes above, and each size comes in a portrait and landscape version.
[wpdm_file id=3]
Using The Photoshop File
Once you have downloaded the zip file, open the Photoshop file you wish to use.. The file will show a canvas that is the size of the poster you are trying to create, at 200dpi. The layers are organised into sets of borders, the choices are as follows:
- Constant width border
- Wider sides than top and bottom
- With supplied insert border (from Ikea)
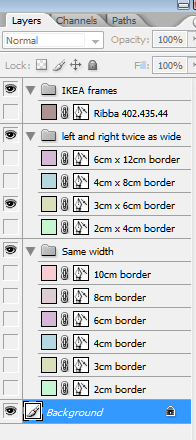
Choose the format of border you would like and choose the border width you would like and click on the “eye” symbol to turn that layer on. All your prints should be placed within that, and note that this photoshop file has stick to edges enabled so as you move an image close to the border area it will stick to the edge, allowing for fine adjustment.
When you have finished placing your images and resizing them, you should then either turn the border off, or change the colour if you want it to be part of your image.
Save the file as a jpg image then sent it to your printer. When it comes back, trim off the red area along the bottom and right hand side and your image should be a perfect fit for your chosen frame!
If you have found this useful and would like any other features added, please leave a comment with your suggestions.
Further Reading
Feature image is by Jessica Ruscello on Unsplash
Thanks for sharing, i love this frames, usined in photoshop, can you also make one for toolpic